
Table of Contents
Introduction
Autodesk introduces new features with each new release of Revit. Many of these new features aim to increase the software’s functionality.
We could be forgiven for skipping over some of the “tweaks” in favour for the big new features but if we take the time to dig a little deeper there are some gems that can really make life a lot easier and enhance our use of the software.
One example of this, which we’ll be looking at here is the new “Elevation from Level” Parameter that has been hard-wired into most of the Component Families.
The Offset Parameter
Up to now, Revit Component Families have had a Parameter in them called “Offset”. This existing Parameter basically allows you move a Family up or down (up being a positive value, down being a negative value) in relation to the Reference Level that it was placed on. This feature has been in Revit since the start, but it did have some major limitations.
The issues with the Offset Parameter were firstly that it would only report an offset value but not what Level you had actually offset from. Secondly even though the Parameter was hard-wired (i.e. built in to the Family,) you still couldn’t report it in a Schedule or Tag it – which meant you had to resort to making a labelled reporting dimension with a shared Parameter (a lot of work).
The lack of “visibility” of the Offset parameter also meant that, amongst other things, you couldn’t affect the visibility or graphical view of the object with View Filters. Getting an offset Parameter to work successfully inside a Family and getting it to report in the Project was a lot of work!
The Elevation from Level Parameter
One of the non-headline new features in Revit 2020 was the “Elevation from Level” Parameter which was added to the majority of Categories within Component Families. In some cases, it will sit alongside the existing Offset Parameter -Casework being an example where both sets of Parameters exist.
In other cases, due to the way that Revit works, things like Structural Columns, which are Component Families, that have a Base Offset and Base Level Parameter already built in don’t get the new Parameter.
Lastly, System Families will not have this new Parameter as they already have inbuilt Parameters that deal with the Offset from their Reference Level anyway.
Some uses for the Elevation from Level Parameter
So that’s the background of where we are now, but what practical application does this Parameter have? Here are some examples to whet your appetite:
Tagging by Offset:
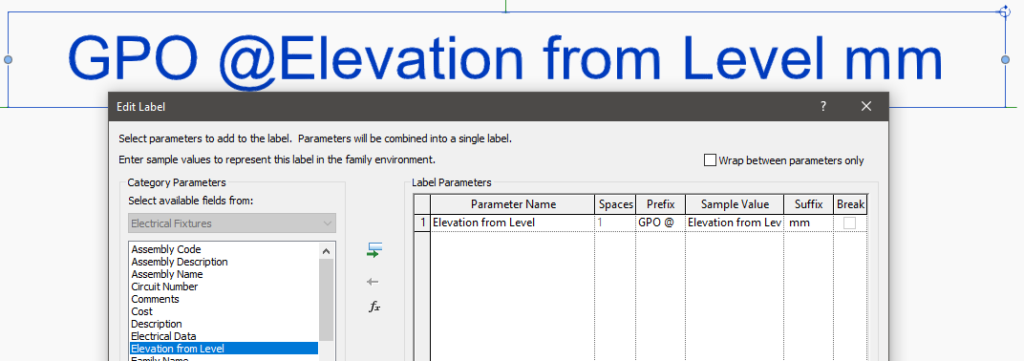
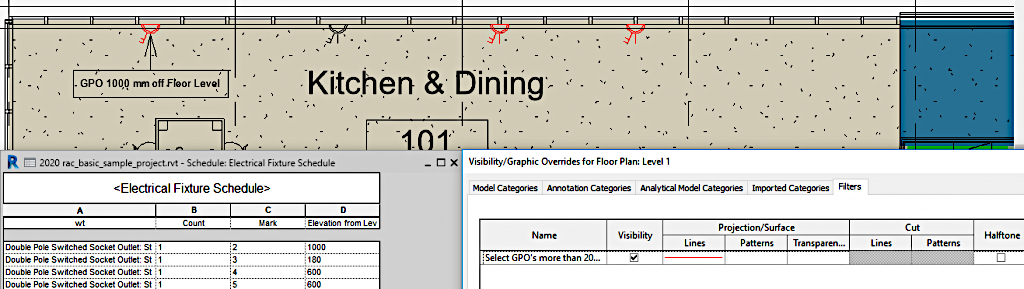
Now that the Elevation from Level Parameter is built-in and exposed in our Families, we can create a Tag for a Component Family Category that reports the offset of the objects from their Reference Level in a View. Here’s an example:
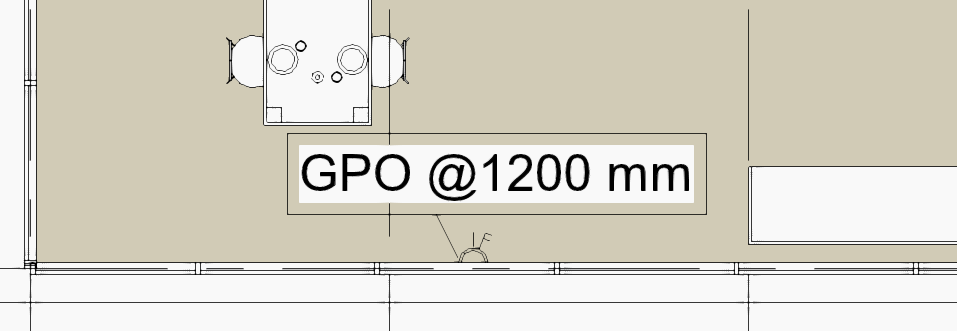
In this case I made a new Tag Family and set it to the Electrical Fixtures Tag category. Then set it up to report the Offset from Level for the object it is tagging and then I added some text to embellish the information as we can see below:
Scheduling using “Elevation from Level”
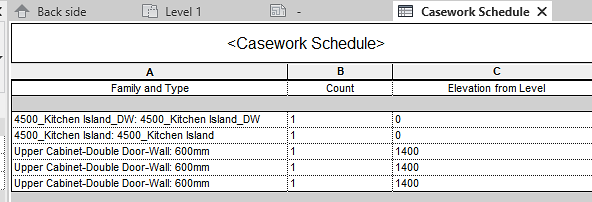
Another benefit of having this new Parameter exposed in our Families is that we can now select the “Elevation from Level” Parameter from the list of available Parameters in any Component Family Category Schedule.
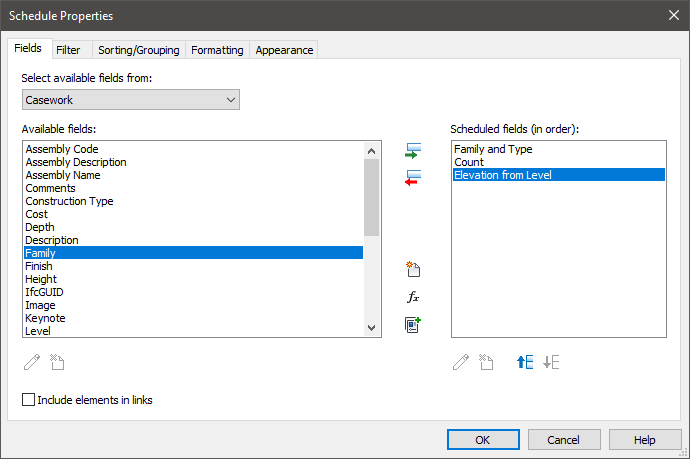
Which means in simple terms that we can report them in our Schedules:
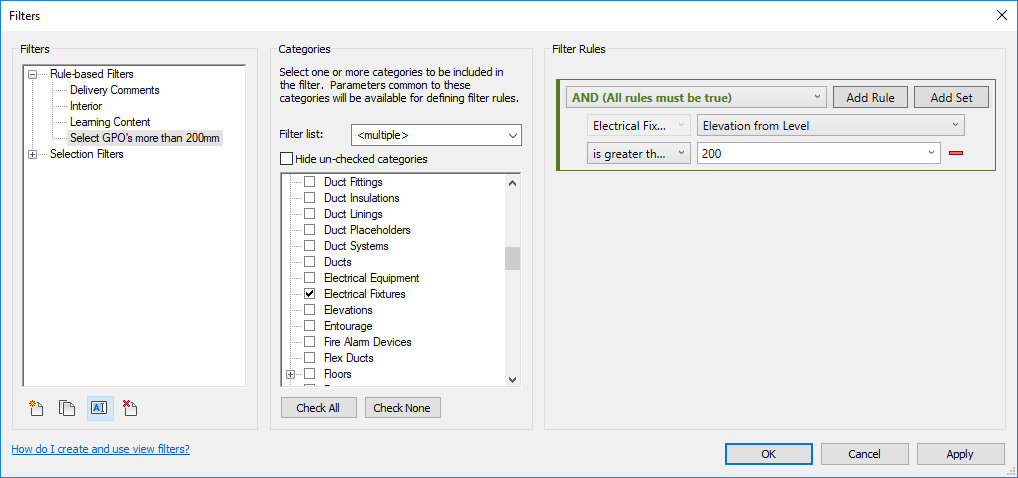
On top of this though the new Parameter can be used as part of a Schedule Filter too, so we can elect to hide or show elements based on a test or multiple tests in the Filter.
View Filters using “Elevation from Level”
We want to avoid overriding or hiding things “by element” in any View as much as we can. To this end, View Filters are a great way of intelligently automating the tasks of altering the way elements display or don’t in our Views. This means that we can apply a smart test to the properties of objects in a View to make them invisible or override their graphics. We can then save this Filter inside a View Template and reuse this in multiple Views.
View Filters now have access to the “Elevation from Level” parameter and this allows us to do some interesting things in our Views. For example we can over-ride the colour of the GPO’s that we had in the earlier example based on whether they are above a skirting height. In this case, I’ve nominated a Height of more than 200mm as being a height that a GPO would be if it was above a skirting height.
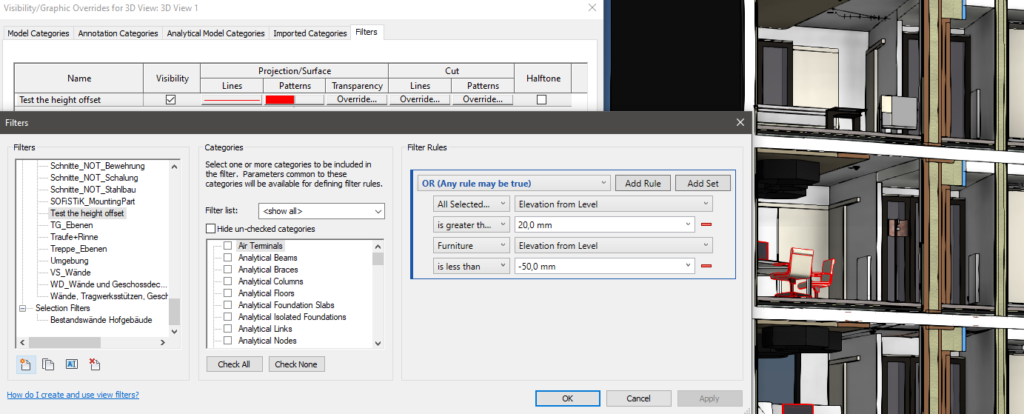
Below we have a single GPO that is sitting at 180mm so it is not having its graphics over-ridden. The others are higher than 200mm and show in Red. Now that we have more powerful “OR” tests in Revit we can even extend the functionality of the Filter further so we could apply this same test to multiple Categories at once (assuming they all support the “Elevation from Level” Parameter.
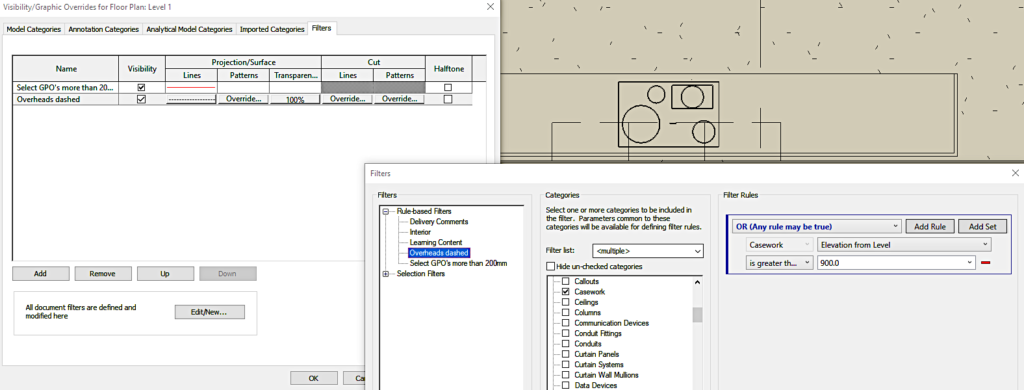
In another example let’s say we want to show any overhead casework items in a dashed line. Using a View Filter will give us consistent & automated results. Also, remember that any View that has a Filter applied to it to override or hide elements will carry over these settings if the View is exported from Revit.
In summary, I think we’ve demonstrated that this is a potentially very powerful feature.
We can use the Parameter to test items to see if they are set above or below a Level. We’ve seen how we can create a View Filter to highlight those problem items. We can do a similar thing through a Schedule that filters out all items that do not sit above or below a Level so we can easily see items that do not comply with our test.
I encourage you to check this feature out and think about how you might apply it in practical ways in your projects.
Visit CadGroup today to purchase Autodesk or discuss your individual requirements with our sales and support team.